
Radio
Simple Wireless Message Communication
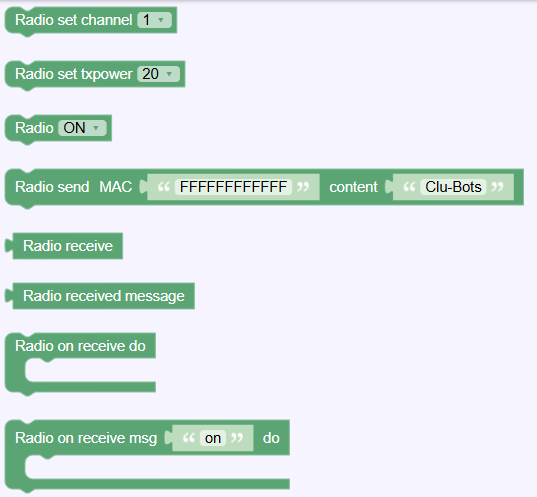
Think of Radio as a simplified wireless messaging system. One device sends a message, another receives it, and the receiving program can react to that message.
ESP-NOW Communication Blocks
These blocks allow students to configure ESP-NOW on the ESP32, activate or deactivate wireless communication, send messages, and receive data from other ESP32 boards.
ESP-NOW Setup and Configuration
| Block | Block Image | What It Does | What the Options Mean |
|---|---|---|---|
| Initialize ESP-NOW |  | Creates an ESP-NOW communication object for the ESP32. | radio.ESPNow() initializes the wireless communication interface. The variable ESPNow_radio stores the object used by the other blocks. |
| Set Wi-Fi Channel |  | Selects the wireless channel used for ESP-NOW communication. | channel: specifies the Wi-Fi channel. 1 selects channel 1. Communicating boards must use compatible channel settings. |
| Set Transmission Power |  | Configures the wireless transmission power using the txpower option. | txpower: transmission power setting. 20 is the configured value passed to the library. Note: The method name in this example is set_channel(), although the argument is txpower. Confirm that the library supports this usage. |
| Activate ESP-NOW |  | Activates the ESP-NOW communication interface. | True enables the interface so it can communicate with other devices. |
| Deactivate ESP-NOW | Deactivates the ESP-NOW communication interface. | False disables the interface and stops ESP-NOW communication. |
Send and Receive Messages
| Block | Block Image | What It Does | What the Options Mean |
|---|---|---|---|
| Send ESP-NOW Message |  | Sends a message through ESP-NOW to a destination device or broadcast address. | First value: destination MAC address. "ffffffffffff" is the broadcast address. Second value: message to send, in this example "Clu-Bots". |
| Receive ESP-NOW Message | 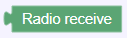 | Retrieves a message received from another ESP-NOW device. | No arguments are supplied. The returned data depends on the library implementation. |
| Received Message Variable |  | Represents the variable used to store or access a received ESP-NOW message. | ESPNow_radio_msg is the message data passed to the receiving function in the special callback blocks below. |
Special Blocks: ESP-NOW Receive Functions
These two special blocks are different from ordinary blocks because they generate complete Python functions and automatically register a callback. They allow students to create actions that happen when another ESP32 sends a message.
Special Block 1 Receive Function and Callback
| Block | Block Image | What It Does | What the Options Mean |
|---|---|---|---|
| Define ESP-NOW Receive Function | 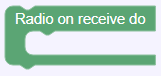 | Creates a function that students can use to process incoming ESP-NOW messages. | mac: MAC address of the sender. ESPNow_radio_msg: message received from that sender. pass: empty placeholder where students add their own instructions. |
| Register ESP-NOW Receive Callback | 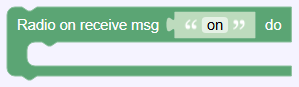 | Registers a callback function that runs automatically when a message arrives. | ESPNow_radio_recv_callback: function that receives the sender's MAC address and message, calls the student's receive function, and checks whether the message has a registered action. |
Python code generated by this special block:
import machineimport radioimport ubinascii# Initialize ESP-NOWESPNow_radio = radio.ESPNow()# Function called to process received messagesdef ESPNow_radio_recv(mac, ESPNow_radio_msg): pass# List of messages with registered actions_radio_msg_list = []# Callback executed when a message arrivesdef ESPNow_radio_recv_callback(mac, ESPNow_radio_msg): global _radio_msg_list try: ESPNow_radio_recv(mac, ESPNow_radio_msg) except: pass if str(ESPNow_radio_msg) in _radio_msg_list: eval('radio_recv_' + bytes.decode( ubinascii.hexlify(ESPNow_radio_msg) ) + '()')# Register the callbackESPNow_radio.recv_cb(ESPNow_radio_recv_callback)
How it works:
- Initializes ESP-NOW communication.
- Creates
ESPNow_radio_recv(), where students can write instructions to process incoming messages. - Creates an empty list called
_radio_msg_listto keep track of messages with registered actions. - When a message arrives, the callback receives the sender's MAC address and message.
- It calls
ESPNow_radio_recv()to process the message. - It checks whether the received message appears in
_radio_msg_list. - If the message is registered, it calls the corresponding
radio_recv_...()function.
Special Block 2 Register an Action for a Specific Message
| # | Block | Block Image | What It Does | What the Options Mean |
|---|---|---|---|---|
| 11 | Register Received Message | _radio_msg_list.append('on') | Adds a message to the list of messages that should trigger a specific function when received. | 'on' is the message that the ESP32 will recognize. The text must match the message sent by the other device. |
| 12 | Define Message Action Function | def radio_recv_on(): | Creates a function that runs automatically when the registered message 'on' is received. | radio_recv_on: function name associated with the message. pass: placeholder where students add the actions to perform. |
Python code generated by this special block:
import machineimport radioimport ubinascii# Initialize ESP-NOWESPNow_radio = radio.ESPNow()# List of messages with registered actions_radio_msg_list = []# Callback executed when a message arrivesdef ESPNow_radio_recv_callback(mac, ESPNow_radio_msg): global _radio_msg_list try: ESPNow_radio_recv(mac, ESPNow_radio_msg) except: pass if str(ESPNow_radio_msg) in _radio_msg_list: eval('radio_recv_' + bytes.decode( ubinascii.hexlify(ESPNow_radio_msg) ) + '()')# Register the callbackESPNow_radio.recv_cb(ESPNow_radio_recv_callback)# Register the message "on"_radio_msg_list.append('on')# Function executed when "on" is receiveddef radio_recv_on(): pass
How it works:
- Initializes ESP-NOW and registers the receive callback.
- Adds
'on'to_radio_msg_list. - Defines
radio_recv_on(), which contains the instructions to execute when the message is received. - When another ESP32 sends the message
'on', the callback checks the list and invokes the corresponding function.
Important notes
- ESP-NOW does not require a router: ESP32 boards can communicate directly.
- Same channel: The communicating boards must use compatible wireless channel settings.
- MAC address: Identifies the destination or sender device.
- Broadcast:
"ffffffffffff"sends the message to all compatible devices listening on the channel. - Callbacks: A callback is a function that runs automatically when an event occurs, such as receiving a message.
- Message matching: The received message must match the registered message for its action function to run.
- Function naming: The special block connects the message
'on'with the functionradio_recv_on().
Important programming detail
In the generated code, the callback uses:
bytes.decode(ubinascii.hexlify(ESPNow_radio_msg))
This converts the received message into hexadecimal text to construct the function name dynamically.
For example, the text 'on' is converted to '6f6e', so the code attempts to call:
radio_recv_6f6e()
However, the second special block defines:
def radio_recv_on(): pass
There is a possible mismatch here: the generated callback constructs a hexadecimal function name, while the example function uses the original text. Unless the library or another part of the program creates the hexadecimal-named function, radio_recv_on() will not be called by that expression. This is worth checking in the Clu-Bots block generator before using this example in a student lesson.
1. Initializing Radio
[ INSERT BLOCK IMAGE HERE: Radio Init ]
The actual generated MicroPython begins with:
Python
import radio
and creates:
Python
ESPNow_radio = radio.ESPNow()
The visible channel example then generates:
Python
ESPNow_radio.set_channel(channel=1)
The relationship is therefore:
Create Radio → Select Channel → Use Radio
The visible example uses:
Channel 1
Configure Radio before trying to send or receive messages.
2. Radio Channel
The channel value is supplied through:
Python
ESPNow_radio.set_channel(channel=1)
The supplied example uses:
Plain Text
1
For beginners, the important concept is simply:
The channel is part of the Radio communication configuration.
Because the reference confirms the generated channel operation but does not provide the complete list of selectable channel values, we should not invent a channel range in the manual.
3. Transmission Power
[ INSERT BLOCK IMAGE HERE: Radio TX Power ]
The visible example uses:
Plain Text
20
and the actual Clu-Blocks Pro generation is:
Python
ESPNow_radio.set_channel(txpower=20)
This confirms an important implementation detail.
Although students see a TX power setting, the Clu-Blocks Pro generator passes that value through:
Python
set_channel(txpower=...)
Therefore, the documentation should preserve both perspectives:
Student concept
TX Power → Transmission-power setting
Actual generation
Python
ESPNow_radio.set_channel(txpower=20)
4. Turning Radio ON and OFF
[ INSERT BLOCK IMAGE HERE: Radio State ]
Previously, only:
on
was visible.
The actual generation now confirms both states.
ON
Python
ESPNow_radio.active(True)
OFF
Python
ESPNow_radio.active(False)
Therefore:
| Block State | Generated Value |
|---|---|
| ON | active(True) |
| OFF | active(False) |
Conceptually:
ON → Radio Active
OFF → Radio Inactive
This is an important improvement over the original documentation.
5. Sending a Radio Message
[ INSERT BLOCK IMAGE HERE: Radio Send ]
The actual supplied example generates:
Python
ESPNow_radio.send(
"ffffffffffff",
"Clu-Bots"
)
``
This reveals that the Radio Send operation contains two important communication concepts:
Destination
Plain Text
ffffffffffff
Content
Plain Text
Clu-Bots
The mental model becomes:
DESTINATION + MESSAGE → SEND
or:
D1 R32 → Radio → Wireless Message → Receiving Device
6. Understanding ffffffffffff
The supplied Radio generation sends the example message to:
Plain Text
ffffffffffff
For the manual, we should preserve that value exactly because it is the actual destination value generated in your reference.
The example therefore becomes:
Destination: ffffffffffff
Message: Clu-Bots
↓
Radio Send
I would not add unsupported assumptions to the beginner block documentation beyond identifying this as the destination value supplied to send().
7. Receiving Radio Information
[ INSERT BLOCK IMAGE HERE: Radio Receive ]
The basic Radio Receive block generates:
Python
ESPNow_radio.recv()
``
Conceptually:
Wireless Information → Radio → Receive
This is the simplest receive operation in the category.
For the first communication exercise, students can think:
Device A → SEND
↓
Wireless Communication
↓
Device B → RECEIVE
8. Received Message
[ INSERT BLOCK IMAGE HERE: Radio Received Message ]
The category also contains a separate block associated with:
Python
ESPNow_radio_msg
This represents the generated variable used for the received message.
This distinction is important.
Receive
Python
ESPNow_radio.recv()
performs the receive operation.
Received Message
Python
ESPNow_radio_msg
represents the message value used by the generated program.
A simple mental model is:
RECEIVE → MESSAGE → USE MESSAGE
9. Observe the Received Message on the PC
For your course, this should be one of the first Radio experiments.
Conceptually:
Radio Message
↓
Receive
↓
Received Message
↓
Serial Port
↓
PC
Students should first observe the incoming message before using that message to control hardware.
This follows the course pattern:
RECEIVE → OBSERVE → INTERPRET → ACT
10. Reacting When a Message Arrives
[ INSERT BLOCK IMAGE HERE: Radio Message Received ]
This block is significantly more sophisticated internally than the simple visual structure suggests.
The real generation creates a receive function such as:
Python
def ESPNow_radio_recv(mac, ESPNow_radio_msg):
pass
and a callback structure:
Python
def ESPNow_radio_recv_callback(mac, ESPNow_radio_msg):
...
The callback is registered using:
Python
ESPNow_radio.recv_cb(ESPNow_radio_recv_callback)
For the student-facing explanation, however, we do not need to begin with callback terminology.
The block can be understood as:
MESSAGE ARRIVES
↓
DO
↓
Run the blocks inside
This block lets the program react when Radio information arrives.
11. MAC + Message
The real callback generation uses:
Python
mac
and:
Python
ESPNow_radio_msg
Therefore, internally, the generated receive structure works with two pieces of information:
MAC
and:
MESSAGE
This gives us a more accurate representation than the earlier generic explanation:
WHO / SOURCE INFORMATION → mac
WHAT WAS RECEIVED → ESPNow_radio_msg
For beginner exercises, the received message will normally be the more immediately useful value.
12. Reacting to a Specific Message
[ INSERT BLOCK IMAGE HERE: Radio Specific Message ]
The visible example uses:
Plain Text
on
The actual Clu-Blocks Pro generation confirms that this is not simply a generic text comparison.
Clu-Blocks Pro creates a list:
Python
_radio_msg_list = []
and registers the specific message:
Python
_radio_msg_list.append('on')
It then creates a message-specific function:
Python
def radio_recv_on():
pass
This means the block represents the concept:
WHEN MESSAGE = "on" → DO these instructions
13. Message-Specific Actions
This is one of the most useful concepts in the Radio category.
For example:
Receive "on"
↓
Perform ON action
A second message could conceptually represent:
Receive another command
↓
Perform another action
This means a Radio message can function as a wireless command, not merely as text to display.
The progression becomes:
MESSAGE → INTERPRET MESSAGE → ACTION
14. How Clu-Blocks Pro Routes Specific Messages
The generated callback checks received messages against:
Python
_radio_msg_list
and Clu-Blocks Pro internally creates a corresponding handler name for registered messages.
Students do not need to reproduce this generated machinery themselves.
That distinction is important:
The student uses the blocks. Clu-Blocks Pro generates the callback and message-routing structure automatically.
This keeps the block-based exercise simple even though the generated MicroPython underneath is more sophisticated.
Simple Receive vs. Event Receive
The Radio category therefore provides two different approaches.
Direct Receive
Python
ESPNow_radio.recv()
Conceptually:
Ask Radio for received information.
Receive Handler
Python
ESPNow_radio.recv_cb(...)
Conceptually:
React when Radio information arrives.
For beginner students, these can be introduced as:
READ
versus:
REACT
Radio as a Simplified ESP-NOW Layer
The real generated code establishes an important technical fact:
Python
ESPNow_radio = radio.ESPNow()
Therefore, the Radio category is not unrelated to ESP-NOW internally.
The student-facing Radio blocks provide a simplified abstraction around the radio.ESPNow() implementation generated by Clu-Blocks Pro.
This means the manual should distinguish the learning interfaces:
Radio category
Focus on:
Channel → Message → Receive → React
Dedicated ESP-NOW category
Document according to the separate ESP-NOW blocks and their own confirmed code generation once the correct ESP-NOW reference is available.
This distinction is especially important because the earlier code you supplied under ESP-NOW accidentally contained the IR generation, so we should still avoid using that incorrect section as the ESP-NOW technical reference.
Radio vs. Infrared
Students have now encountered two very different forms of communication.
| Infrared | Radio |
|---|---|
| Uses IR signals. | Uses wireless Radio communication through the generated radio.ESPNow() object. |
| Uses command/raw/pulse information. | Uses messages such as Clu-Bots or on. |
| IR receiver must detect transmitted infrared signals. | Radio uses the configured wireless communication object. |
| Remote controls are a natural example. | Device-to-device messaging is a natural example. |
The important teaching idea is:
Both communicate, but they use different mechanisms and different program blocks.
Radio with Sensors
Once communication works, sensor information can become the transmitted content.
Conceptually:
Sensor
↓
D1 R32 A
↓
Radio Send
↓
D1 R32 B
↓
Radio Receive
↓
Serial Port / Display / Action
This allows students to progress from simple text messages to distributed robotics projects.
Radio with Outputs
A received message can also control an output.
For example:
Receive "on"
↓
Specific Message Handler
↓
LED ON
or:
Received Command
↓
Logic / Control
↓
Servo / Buzzer / Display
This changes Radio from a communication demonstration into a control system.
Radio and Serial Port
Serial should remain central while students learn Radio.
Sender
Conceptually:
Create Message → Radio Send → Report through Serial
Receiver
Conceptually:
Radio Receive → Received Message → Serial Port → PC
The students can then verify:
- What was transmitted.
- What was received.
- Whether the received command triggered the expected action.
This makes wireless communication much easier to troubleshoot and understand.
Quick Guide for Students
Am I starting Radio communication?
Use:
Radio Init
Do I need the communication channel?
Configure:
channel
Do I need the transmission-power setting?
Use:
TX power
Do I want Radio active?
Use:
ON
Do I want to deactivate it?
Use:
OFF
Do I want to send a message?
Use:
Radio Send
Do I want to receive information directly?
Use:
Radio Receive
Do I need the received message?
Use:
Radio Received Message
Do I want instructions to run when a message arrives?
Use:
Radio message received → do
Do I want instructions to run for a particular message?
Use:
Radio message received certain "on" → do
Quick Reference
| Family | Confirmed Generation | Main Idea |
|---|---|---|
| Radio Object | radio.ESPNow() | Create the Radio communication object. |
| Channel | set_channel(channel=1) | Configure the visible channel value. |
| TX Power | set_channel(txpower=20) | Configure the TX-power value. |
| ON | active(True) | Activate Radio. |
| OFF | active(False) | Deactivate Radio. |
| Send | send(destination, message) | Send content to a destination. |
| Receive | recv() | Perform direct receive. |
| Received Message | ESPNow_radio_msg | Use the received message value. |
| Receive Handler | recv_cb(...) | Register the generated receive callback. |
| Specific Message | _radio_msg_list.append('on') | Register a specific message. |
| Message Action | radio_recv_on() | Function associated with the example "on" message. |