Interface
Look at the main interface of Clu-Blocks Pro . The interface is designed to make it easy to create programs using blocks, MicroPython code, or both at the same time.
The main interface is divided into several key areas:
| Area | Description |
|---|---|
| CONTROL PANEL | Contains the main buttons used to interact with Clu-Blocks Pro and the D1 R32, including Undo, Redo, Connect, Disconnect, Upload Code, and Serial Monitor. |
| BLOCKS AREA | Contains the available block categories. Select a category to display the blocks available within it. |
| BLOCKS CODE | The visual programming workspace where blocks are dragged, arranged, and connected to create a program. |
| CODE IN TEXT | Displays the MicroPython code generated from the blocks. You can also write and edit MicroPython code directly in this area. |
| MESSAGE PROMPT | Displays Serial Port information, connection information, program messages, upload results, and error messages. |
| MODE SWITCH | Allows you to switch between Block Mode, Text Mode, and Mix Mode. |
| FILE | Provides the tools to create, open, and save projects. |
| STATUS OF CONNECTION D1 R32 | Shows whether the D1 R32 is currently connected to the computer. |
| CODE LANGUAGE | Displays the programming language currently being used. Clu-Blocks Pro generates MicroPython code. |
Main Interface in Mix Mode
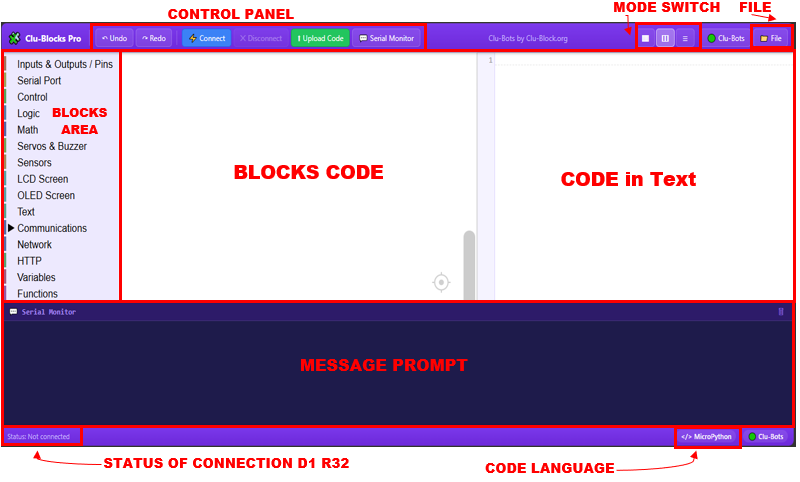
Figure 1. Clu-Blocks Pro interface in Mix Mode, showing the Blocks Area, Blocks Code Area, Text Code Area, Control Panel, Message Prompt, connection status, and code language.
In Mix Mode, you can view the visual blocks and the corresponding MicroPython code at the same time.
This mode is especially useful for learning because you can compare each block-based instruction with the MicroPython code it generates.
Text Mode
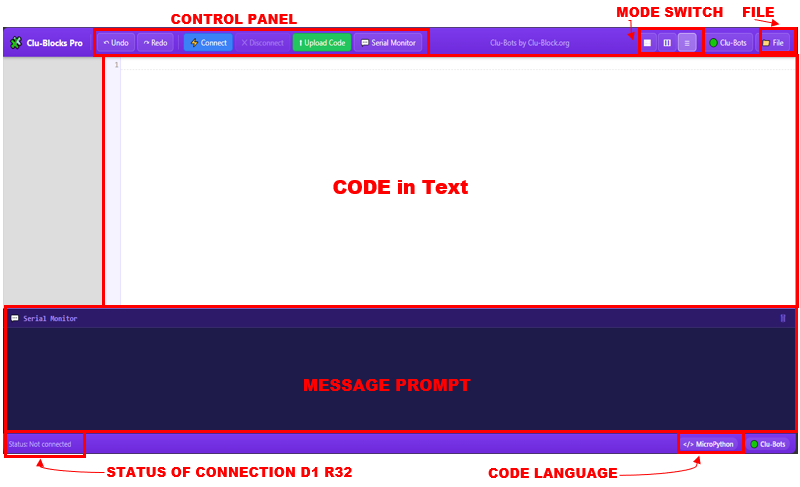
Figure 2. Clu-Blocks Pro interface in Text Mode.
In Text Mode, the MicroPython editor occupies the main programming area. This mode allows you to view and edit the MicroPython code directly.
Caution: Changes made directly to the MicroPython code are not automatically reflected in the Blocks Code Area. If you return to Block Mode, modifications made only in Text Mode may be lost. Save your work before changing programming modes.
When programming directly in MicroPython, the program uses the ESP32 GPIO pin numbering.
Block Mode
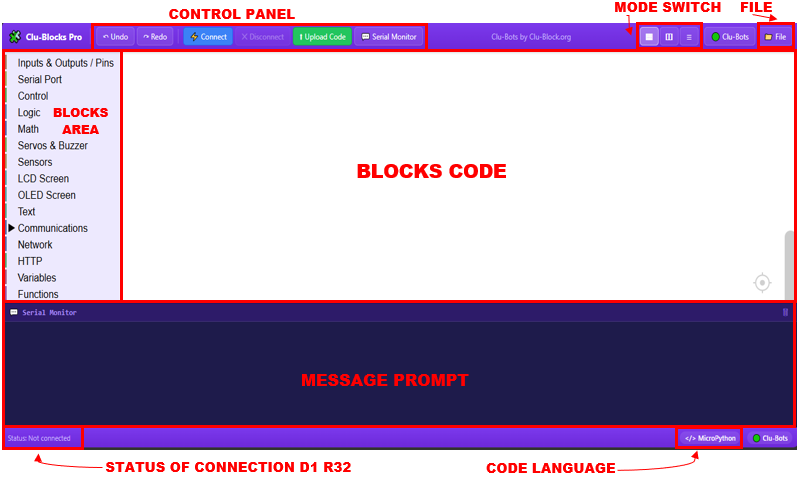
Figure 3. Clu-Blocks Pro interface in Block Mode.
In Block Mode, the Blocks Area and Blocks Code Area are displayed.
Select blocks from the categories on the left, drag them into the Blocks Code Area, and connect them to create your program.
Control Panel
The Control Panel contains the main tools used to interact with Clu-Blocks Pro and the D1 R32.
| Image | Tool | Function |
|---|---|---|
 | Undo | Reverses the most recent change. You can also use Ctrl + Z. This is useful if you accidentally delete, move, or modify part of your program. |
 | Redo | Restores an action that was previously undone. |
 | Connect | Establishes the connection between Clu-Blocks Pro and the D1 R32. Select the serial port where the D1 R32 is connected. |
 | Disconnect | Ends the serial connection between Clu-Blocks Pro and the D1 R32. |
 | Upload Code | Sends your program to the D1 R32. Check the Message Prompt for information about the upload process. |
 | Serial Monitor | Displays information sent from the D1 R32 to the computer through the Serial Port. |
Connecting the D1 R32
Before uploading a program, you must establish a connection between Clu-Blocks Pro and the D1 R32.
- Connect the D1 R32 to the computer.
- Click Connect in the Control Panel.
- Select the serial port associated with the D1 R32.
- Establish the connection.
- Check the Status of Connection D1 R32 indicator at the bottom-left corner of the interface.
When you no longer need the connection, click Disconnect.
Upload Code
When your program is ready, click Upload Code to send the program to the D1 R32.
The Message Prompt provides information about the upload process.
If the upload fails, check:
- Your program.
- The selected serial port.
- The USB connection to the D1 R32.
- The physical connections of the electronic components.
Message Prompt and Serial Monitor
The Message Prompt provides useful information while you are creating and testing your program.
This area can display:
| Information | Purpose |
|---|---|
| Serial information | Displays information sent from the D1 R32 through the Serial Port. |
| Program messages | Allows your program to display values, text, and other useful information. |
| Upload information | Indicates the status of the upload process. |
| Error messages | Helps identify problems with the program or upload process. |
| Connection information | Provides information related to the communication between the computer and the D1 R32. |
The Serial Monitor is especially important throughout the course because it allows you to observe what the D1 R32 is doing while your program is running.
Mode Switch
The Mode Switch buttons allow you to change how your program is displayed.
| Mode | Description |
|---|---|
| Block Mode | Displays the Blocks Area and Blocks Code Area for visual programming. |
| Text Mode | Displays the MicroPython editor for text-based programming. |
| Mix Mode | Displays the blocks and their corresponding MicroPython code at the same time. |
Important
When you switch from Block Mode to Text Mode, you can see the MicroPython code generated by your blocks.
Changes made directly to the MicroPython code are not automatically reflected in the blocks.
Save your work before changing programming modes to avoid losing changes.
File Menu
The File menu provides the basic tools for managing your Clu-Blocks Pro projects.
| Option | Function |
|---|---|
| New | Creates a new project and clears the current workspace. Save your current project first if you want to keep it. |
| Open | Opens a previously saved project in MIX format. |
| Save | Saves the current project in MIX format. |
| Save As | Saves the current project in MIX format using a new name. |
D1 R32 Connection Status
The Status of Connection D1 R32 indicator is located at the bottom-left corner of the Clu-Blocks Pro interface.
This indicator allows you to quickly check whether the D1 R32 is currently connected to the computer.
Code Language
The Code Language indicator is located at the bottom of the interface.
Clu-Blocks Pro generates MicroPython code from the blocks you create.
When working directly with MicroPython, remember that the program uses the ESP32 GPIO pin numbering.
Navigating the Blocks Code Area
The Blocks Code Area includes several tools that make it easier to navigate and organize your visual program.
| Image | Tool | Function |
|---|---|---|
 | Center Workspace | Returns the view to the main area of your block program. This is useful when you have moved around a large workspace. |
 | Zoom + | Increases the size of the blocks displayed in the workspace. |
 | Zoom − | Decreases the size of the blocks displayed in the workspace. |
| Mouse Wheel | Can also be used to zoom in and out. | |
 | Bin | Deletes unwanted blocks. Drag a block to the Bin to remove it from the program. |
Browsing and Using Blocks
1. Explore Block Categories
In the Blocks Area, located on the left side of the interface, you will find the available block categories.
These include: Inputs & Outputs / Pins, Console - Serial Port, Control, Logic, Math, Servos & Buzzer, Sensors, LCD Screen, OLED Screen, Text,
Communications, Bluetooth, Infrared (IR), ESP-NOW, Network, HTTP, Variables, Functions.
Click a category to see the blocks available within it.
2. Drag and Drop Blocks
Select a block from a category and drag it into the Blocks Code Area.
Release the block where you want to place it.
3. Connect Blocks
Blocks contain connection points that allow compatible blocks to fit together.
Drag blocks toward one another until the appropriate connection points snap together.
By connecting blocks, you create the sequence of instructions that your program will execute.
4. Adjust Blocks
Many blocks contain configurable values or options.
Depending on the block, you may be able to:
- Select pins.
- Enter numbers.
- Enter text.
- Choose an operation.
- Select an option from a menu.
- Connect additional blocks.
5. View the MicroPython Code
Switch to Text Mode or Mix Mode to see the MicroPython code generated by your blocks.
This is an important part of Clu-Blocks Pro because it allows you to compare:
Visual Blocks → MicroPython Code
By regularly comparing both forms of programming, you can gradually understand how visual programming instructions are translated into real MicroPython code.
Basic Example: Send "Clu-Bot" to the Computer
Let's create a simple program that sends the message "Clu-Bot" from the D1 R32 to the computer through the Serial Port.
| Step | Action |
|---|---|
| 1 | Open the Serial Port category. |
| 2 | Drag the appropriate Serial Port block into the Blocks Code Area. |
| 3 | Add or connect the required Text block and enter "Clu-Bot". |
| 4 | Connect the D1 R32 to the computer. |
| 5 | In the Control Panel, click Connect and select the serial port associated with the D1 R32. |
| 6 | Click Upload Code to send the program to the D1 R32. |
| 7 | Observe the Serial Monitor / Message Prompt. |
When the program runs, you should see:
Clu-Bots
in the Message Prompt / Serial Monitor.
What did you learn?
This simple example introduces an important concept that you will use regularly throughout the course:
The D1 R32 can send information to the computer through the Serial Port.
This allows you to observe sensor values, program states, calculations, messages, and other information while your program is running.